1. Design Technology Process Journal
th
Date: March, 4 , 2011
Name: Jee Yeon Park
Title: Dr illing the holes on the side of leaf+ st em ,
dow eling through the holes, drilling the holes on the
pet al s+ li ght suppor t , scr ew in g through the 。
holes
What did I do?
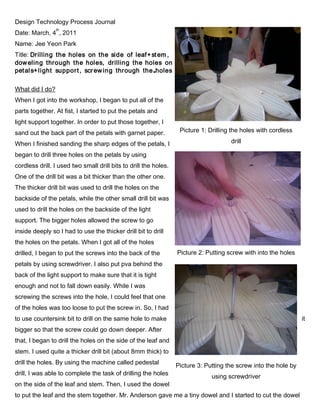
When I got into the workshop, I began to put all of the
parts together. At fist, I started to put the petals and
light support together. In order to put those together, I
sand out the back part of the petals with garnet paper. Picture 1: Drilling the holes with cordless
When I finished sanding the sharp edges of the petals, I drill
began to drill three holes on the petals by using
cordless drill. I used two small drill bits to drill the holes.
One of the drill bit was a bit thicker than the other one.
The thicker drill bit was used to drill the holes on the
backside of the petals, while the other small drill bit was
used to drill the holes on the backside of the light
support. The bigger holes allowed the screw to go
inside deeply so I had to use the thicker drill bit to drill
the holes on the petals. When I got all of the holes
drilled, I began to put the screws into the back of the Picture 2: Putting screw with into the holes
petals by using screwdriver. I also put pva behind the
back of the light support to make sure that it is tight
enough and not to fall down easily. While I was
screwing the screws into the hole, I could feel that one
of the holes was too loose to put the screw in. So, I had
to use countersink bit to drill on the same hole to make it
bigger so that the screw could go down deeper. After
that, I began to drill the holes on the side of the leaf and
stem. I used quite a thicker drill bit (about 8mm thick) to
drill the holes. By using the machine called pedestal Picture 3: Putting the screw into the hole by
drill, I was able to complete the task of drilling the holes using screwdriver
on the side of the leaf and stem. Then, I used the dowel
to put the leaf and the stem together. Mr. Anderson gave me a tiny dowel and I started to cut the dowel
2. into two pieces. I used the gent saw to cut the dowel. As soon as I got all the pieces ready, I started to
put the dowel into the holes that I have drilled on the leaf. The holes were quite small to put the dowel in
but by using the wooden mallet, I could push the dowel easily. I also used pva into the holes to make
sure that the dowel doesn't fall down. When I got the dowels put into the holes, I began to put the stem
together by tapping it with wooden mallet. During this lesson, I was able to complete putting most of the
parts together by using varieties of construction techniques.
Changes in the gantt chart
There were some changes in the gantt chart. I could
notice that I was going ahead of the time line that I have
predicted. Since I used most of the time in today’s
lesson by putting most of the parts together, I think I
was able to catch along with my timeline,
Emotions
During this lesson, I was very pleased that I could see
the end of my project. I am now at the end stage of making the project. I was so excited that I could be
able to finish putting most of the parts together. Things
that are only left is to put the base and the stem Picture 4: Picture of countersink bit
together. I was able to predict that I could finish putting
all the parts together in the next lesson.
IB Learner Profile & AOI
From today’s lesson, I started to continue to put most of
the parts. I was being a risk taker during this lesson
because I took a risk of finishing the stage of putting
things together by the end of the lesson. Although I
haven’t finished putting all the parts together, I could
finish the
half of the
Picture 5: Picture of me making the hole
stage in
bigger by using the cordless drill
today’s
lesson. I
think this
Picture 6: Picture of me cutting the dowel lesson Picture 6: Picture of me tapping the dowel
with gent saw with the wooden mallet
3. was related to community and service because most of the time in today’s lesson, Mr. Anderson gave
me some advices to my project and helped me when I was struggling.